Digital cameras with interchangeable lenses suffer from grime problem that never affected film cameras ... dust on the sensor.
This is different from dust on the lens. The tiniest specks on the sensor will show up as spots in your photograph, especially on large areas of plain colour, such as the sky. And they become more visible if you are using small apertures such as ƒ16 or ƒ22.
The problem is being addressed by manufacturers and many cameras now have self-cleaning sensors that vibrate at very high speed to shake dust off. How well they work is debateable. But even if they work perfectly, the shaken-off dust is still somewhere inside the camera and could possibly end up on the sensor again
Do you dare check your sensor for dust?
Close your lens down to its absolute minimum aperture, point your camera at a patch of clear blue sky and take a photograph. Don’t worry about the shutter speed. It can be as slow as an arthritic snail and not matter. Dust is what you’re looking for, and it will be sitting in the camera, so shake doesn’t matter.
Having taken your sky photograph, load it into an image editing program and examine at 100% ... and be prepared. If you want a real fright, click on ‘Automatic Levels’. I guarantee, you will find dust specks, even if you have a sensor cleaning system. Even brand new cameras have dust.
Here's my sky photo, taken at f40, with just a few of the dust spots ringed.
Yours may be like that, or better, or worse, but sooner or later you will have to do (or have done) a bit of interior cleaning because you will take a photo like this ...
It's no big deal because you can easily clone out the spot just above and to the right of the balloon, using your image editing program. (You will probably want to clone out those annoying contrails, too). But you don't want to be doing that photograph after photograph. So, you go to your instruction book ... and find an Awful Warning about not doing-it-yourself.
Does that mean sending your camera off to a service lab?
No. In the words of the late, great Douglas Adams – DON’T PANIC.
It is perfectly possible to clean your sensor yourself, if you take a bit of care.
And ... incidentally ... what you are cleaning is not the sensor. It is something called the ‘optical low pass filter’, which is a little bit tougher than the manufacturers would have you believe. (Though this does not mean you can be rough with it.) I’ll call it the sensor, anyway. That’s easier than writing ‘optical low pass filter’ every time.
Although your ‘dust photo’ – the one of the sky – may show many specks, like mine, I wouldn’t advise cleaning unless they are regularly ruining photographs. If they’re not causing any problems, leave well alone.
Once you do decide to take the plunge, I’d advise a three-step process checking with a ‘sky photograph’ between each step. If, after any step, the dust has vanished, then stop ...
Step 1
Make sure your camera battery is fully-charged* and, working in a dust-free location (the bathroom is ideal for this), take the lens off and lock the mirror up. Then, holding the camera upside down above your head (so any dust will fall out) use your rocket blower to puff vigorously all over the sensor.
As you puff, take great care to ensure that the plastic nozzle of the blower does not strike the metal lens-mounting flange. I learned that lesson when, the first time I was cleaning, I found more and more particles of something coming from somewhere. Guess where?
Step 2
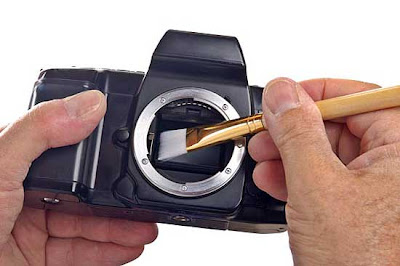
If all that blowing hasn’t shifted the dust, then use a special sensor-cleaning brush with very fine hairs. You spin this at high speed, using a little electric motor to charge the filaments with static electricity. Then draw it across the sensor once so the static attracts the dust particles.
Incidentally – make sure never to touch the brush hairs. No matter how clean your hands are, they are always slightly greasy. Your skin-grease will transfer itself to the brush hairs and thence on to your sensor. Then you will have problems.
Step 3
If some stubborn dust specks are still present then use a swab to shift them. You can buy packs of these, together with specially-formulated cleaning fluid, in photo shops. Make sure you specify the model of camera so that you buy the right size. Take one swab, moisten it with a drop of the fluid and draw it across the sensor once.
I have applied these 3 steps since I first got my camera and I have only ever had to use Step 3 once.
Finally, I repeat, DON’T PANIC. Unfortunately some photographers do, and become neurotic about dust. They spend an inordinate amount of time trying to avoid it when they should be photographing.
I have seen lens changing bags on sale in camera shops. The theory is that you put your camera and replacement lens into the bag and zip it up. Then you put your hands into sort of built-in gloves, change lenses inside the bag (honestly!) and then take the whole lot out again.
Laugh? I nearly died. Apart from the fact that, by the time you’ve completed that palaver, whatever you were going to photograph has long gone, the bag itself must act as a massive dust trap after a few uses. Unless you’re going to carefully vacuum clean the interior every evening, it’s a complete waste of money.
Dust in your camera is inevitable. For starters, the shutter is mechanical. Every time you take a photograph, it wears a fraction, releasing tiny particles. Then your zoom lens is like an air pump. Every time you zoom in and out you pump air in and out of the camera body, and that’s going to contain dust too.
Dust is everywhere. Live with it, and get on with making photographs.
* Be sure the battery is fully charged before you lock the mirror up because, if the battery dies with the mirror up ... I don’t know what happens. I don’t like to think about it.


