One of the big headaches faced by photographers is the theft of their images. Digital images can be copied with ease. Anything that appears on a monitor can be copied.
One way around this is to make sure that any images that you publish on the internet are of low quality so that they cannot be printed or enlarged to any size, but of sufficiently high quality to look good on a screen. I've discussed that here.
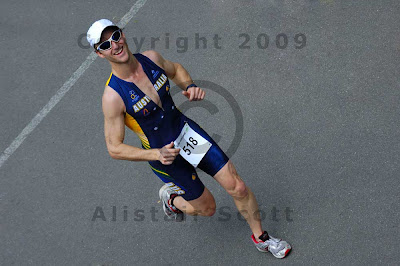
But what if you need to send someone a high-resolution image? A potential customer, for example. The way around this is to watermark your image. Here's one of mine that I've watermarked:
And how do you do that?
If you have Photoshop, a quick and relatively easy way of doing it is to create your own watermark 'brush'. Then you can apply this like a stamp, again and again, to a whole series of images.
Here's how you do it ...
Creating your watermark brush
1. In Photoshop, create a brand new empty document with a white background. Don’t make this too big, otherwise you won’t be able to save it as a brush. 3000 pixels wide by 2000 pixels high is a good size. Choose ‘greyscale’ and ‘background colour’ as options, making sure the background is white.
2. If you want the Copyright symbol in your watermark ( © ) open the Custom Shape Tool – the bottom choice in the menu that pops out when you select the menu of Shape Tools, immediately below the Text tool.
3. Go up to the Options bar at the top and select the ‘Fill Pixels’ button – it’s the third choice from the left (it’s a little square). This creates your custom shape with pixels rather than vectors – important.
4. Press Enter and a menu of shapes appears. You’ll find the Copyright symbol in that. Select it, then click and drag out the symbol somewhere in the middle of your blank document. To ensure that the symbol comes out perfectly round, hold down the ‘shift’ key as you do this.
(If you don’t want the Copyright symbol, leave out steps 2-4)
5. Switch on the Type Tool, select your font and its size, draw a box where you want your text to appear in relation to the Copyright symbol.
6. Then type your text. Make sure it is black. For best-looking results select ‘Centre Text’. You can change the font size as you work to match your Copyright symbol. You can also select Bold and/or Italic if you want. Play with it. Don’t worry if the text doesn’t line up exactly with the Copyright symbol at this stage.
7. When you’ve finished typing your text, click on the Move tool (the symbol top right of the toolbox, with four arrows). Select your text and align it exactly as you want it in relation to the Copyright symbol.
9. Select the Rectangular Marquee (top left of toolbox) and draw a rectangle close around your watermark.
10. Go to the Edit menu and select Define Brush. A dialogue box will pop up. Give your brush a name and ... voilà! ... it’s done. (N.B. The preview on the Brush Tool menu may make your brush look all squashed and deformed. Don’t worry. It won’t come out like that.)
Applying your watermark
1. Open the image you want to watermark.
2. From the ‘Layers’ palette, create a new layer (icon at bottom, second from right).
3. Making sure that you are in your new layer, select the Brush Tool and choose your personal ‘Copyright’ brush (It’ll probably be at the bottom of the list). Stamp it wherever you want. You can adjust its size to fit your image. You can stamp it once big across the centre, like I’ve done, or several times, smaller, all over.
4. Reduce the opacity of this layer so that the watermark becomes transparent. Reducing it to 30% works well, but you may wish to do more, or less. See how it looks.
5. Flatten the image (i.e. join the layers together) and save it with a different name from the original ... unless you want to ruin the original.
And it’s done.
P.S. Really, really tough question. Can you spot the bad tangent in my watermarked photo?
One way around this is to make sure that any images that you publish on the internet are of low quality so that they cannot be printed or enlarged to any size, but of sufficiently high quality to look good on a screen. I've discussed that here.
But what if you need to send someone a high-resolution image? A potential customer, for example. The way around this is to watermark your image. Here's one of mine that I've watermarked:

And how do you do that?
If you have Photoshop, a quick and relatively easy way of doing it is to create your own watermark 'brush'. Then you can apply this like a stamp, again and again, to a whole series of images.
Here's how you do it ...
Creating your watermark brush
1. In Photoshop, create a brand new empty document with a white background. Don’t make this too big, otherwise you won’t be able to save it as a brush. 3000 pixels wide by 2000 pixels high is a good size. Choose ‘greyscale’ and ‘background colour’ as options, making sure the background is white.
2. If you want the Copyright symbol in your watermark ( © ) open the Custom Shape Tool – the bottom choice in the menu that pops out when you select the menu of Shape Tools, immediately below the Text tool.
3. Go up to the Options bar at the top and select the ‘Fill Pixels’ button – it’s the third choice from the left (it’s a little square). This creates your custom shape with pixels rather than vectors – important.
4. Press Enter and a menu of shapes appears. You’ll find the Copyright symbol in that. Select it, then click and drag out the symbol somewhere in the middle of your blank document. To ensure that the symbol comes out perfectly round, hold down the ‘shift’ key as you do this.
(If you don’t want the Copyright symbol, leave out steps 2-4)
5. Switch on the Type Tool, select your font and its size, draw a box where you want your text to appear in relation to the Copyright symbol.
6. Then type your text. Make sure it is black. For best-looking results select ‘Centre Text’. You can change the font size as you work to match your Copyright symbol. You can also select Bold and/or Italic if you want. Play with it. Don’t worry if the text doesn’t line up exactly with the Copyright symbol at this stage.
7. When you’ve finished typing your text, click on the Move tool (the symbol top right of the toolbox, with four arrows). Select your text and align it exactly as you want it in relation to the Copyright symbol.
9. Select the Rectangular Marquee (top left of toolbox) and draw a rectangle close around your watermark.
10. Go to the Edit menu and select Define Brush. A dialogue box will pop up. Give your brush a name and ... voilà! ... it’s done. (N.B. The preview on the Brush Tool menu may make your brush look all squashed and deformed. Don’t worry. It won’t come out like that.)
Applying your watermark
1. Open the image you want to watermark.
2. From the ‘Layers’ palette, create a new layer (icon at bottom, second from right).
3. Making sure that you are in your new layer, select the Brush Tool and choose your personal ‘Copyright’ brush (It’ll probably be at the bottom of the list). Stamp it wherever you want. You can adjust its size to fit your image. You can stamp it once big across the centre, like I’ve done, or several times, smaller, all over.
4. Reduce the opacity of this layer so that the watermark becomes transparent. Reducing it to 30% works well, but you may wish to do more, or less. See how it looks.
5. Flatten the image (i.e. join the layers together) and save it with a different name from the original ... unless you want to ruin the original.
And it’s done.
P.S. Really, really tough question. Can you spot the bad tangent in my watermarked photo?


2 comments:
The road marking is going right through the runner's head and parallel to his eyes. Am I right, am I right?
Hey! You're right! Well done. But no prizes, I'm afraid.
Post a Comment